(Tutorial) How To Flash Asus’s Firmware Via Asus Flash Tool
Introduction:
In the vast landscape of technology, keeping your Asus device up-to-date is key to unlocking its full potential. This tutorial aims to guide you through the process of flashing Asus firmware using the Asus Flash Tool. Whether you’re a tech-savvy enthusiast or a novice, this step-by-step guide ensures a seamless and stress-free experience.
1. Understanding the Basics: What is Firmware?
Before diving into the tutorial, let’s grasp the basics. Firmware is the software that runs on your device’s hardware, providing the necessary instructions for its proper functioning. Flashing firmware involves updating or reinstalling this software, akin to giving your device a software makeover.
2. Why Flashing Firmware Matters:
Flashing firmware is crucial for several reasons:
- Bug Fixes and Enhancements: Firmware updates often come with bug fixes and performance enhancements, ensuring your device runs smoothly.
- Security Patches: Regular updates address security vulnerabilities, safeguarding your device against potential threats.
- Feature Additions: Flashing firmware can introduce new features, optimizing your user experience.
3. Introducing Asus Flash Tool: The Gateway to Firmware Bliss:
Asus Flash Tool is the official tool provided by Asus to facilitate firmware flashing on Asus devices. Before proceeding, ensure you have the latest version of the tool downloaded from the official Asus website.
4. Step-by-Step Tutorial: Flashing Asus Firmware Like a Pro:
4.1 Backup Your Data:
- Begin by backing up important data on your device to prevent any loss during the flashing process.
4.2 Download Necessary Files:
- Visit the official Asus support website and download the latest firmware for your specific Asus device. Make sure to select the correct model and region.
4.3 Install Asus Flash Tool:
- Install the Asus Flash Tool on your computer by following the on-screen instructions. Once installed, launch the tool.
4.4 Connect Your Asus Device:
- Use a USB cable to connect your Asus device to the computer. Ensure the device is in Fastboot mode by powering it off and holding the Volume Up button while powering it back on.
4.5 Select Firmware:
- In the Asus Flash Tool, click on the “Browse” button and select the downloaded firmware file. The tool will recognize your connected device.
4.6 Begin the Flashing Process:
- Once the firmware is selected, click on the “Flash” button to initiate the flashing process. This may take a few minutes, so be patient and avoid disconnecting your device during this time.
4.7 Completion and Reboot:
- Once the flashing process is complete, the tool will prompt you. Your Asus device will automatically reboot with the updated firmware.
5. Considerations and Tips: Navigating Potential Challenges:
- Ensure Compatibility: Double-check that you’ve downloaded the correct firmware for your specific Asus device model and region.
- Stable Internet Connection: A stable internet connection is crucial during the firmware download process to avoid interruptions.
- Battery Level: Ensure your Asus device has sufficient battery charge to withstand the entire flashing process.
Conclusion: A Renewed Asus Experience Awaits You:
In conclusion, mastering the art of flashing Asus firmware using the Asus Flash Tool empowers you to keep your device in peak condition. This tutorial, designed with simplicity in mind, caters to users of all levels of expertise. By following these step-by-step instructions, you embark on a journey to enhance your Asus device’s performance, security, and feature set. Unlock the true potential of your Asus gadget and enjoy a renewed, optimized experience with the latest firmware. Happy flashing!
(Tutorial) How to flash Asus’s firmware via Asus Flash Tool
DOWNLOAD:
- Driver:
- Tool:
- ASUSPCTool_AFT_New_11-11-2020.rar | AFH | OneDrive | GDrive2
(AFT_ASUS_v1.0.0.86, AFT_Chino_V1.0.0.5_L0506, AFT_WingTech_v1.9.8.0_K0925, AFT_Arima_1.0.7_K0919, AFT_HuaQin_v1.0.20_K0904, AFT_Wind_v1.1.4_K0213) - ASUSPCTool_AFT_New_31-08-2020.rar | AFH | OneDrive | GDrive2
(Tool version: AFT_ASUS_v1.0.0.83, AFT_Chino_V1.0.0.5_L0506, AFT_WingTech_v1.9.8.0_K0925, AFT_Arima_1.0.7_K0919, AFT_HuaQin_v1.0.20_K0904, AFT_Wind_v1.1.4_K0213) - ASUSPCTool_AFT_New_22-07-2020.rar | AFH | OneDrive | GDrive2
(Tool version: AFT_ASUS_1.0.0.82, AFT_Arima_1.0.7, AFT_Chino_1.0.0.5, AFT_HuaQin_1.0.20, AFT_Wind_1.1.4, AFT_WingTech_1.9.8.0) - AFT_ASUS_1.0.0.72.rar (104M)
- AFT_Asus_v1.0.0.70_csc.rar (113M)
- ASUS.Flash.Tool.v1.0.0.45.rar (102M)
- ASUSPCTool_AFT_New_11-11-2020.rar | AFH | OneDrive | GDrive2
HOW TO:

Reboot device to DROIDBOOT (Power off, press and hold Volume Up + Power)
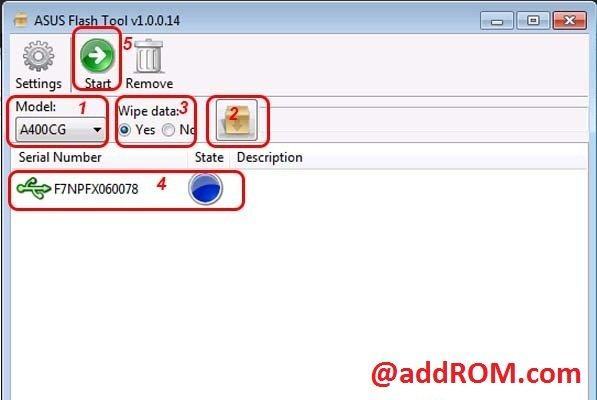
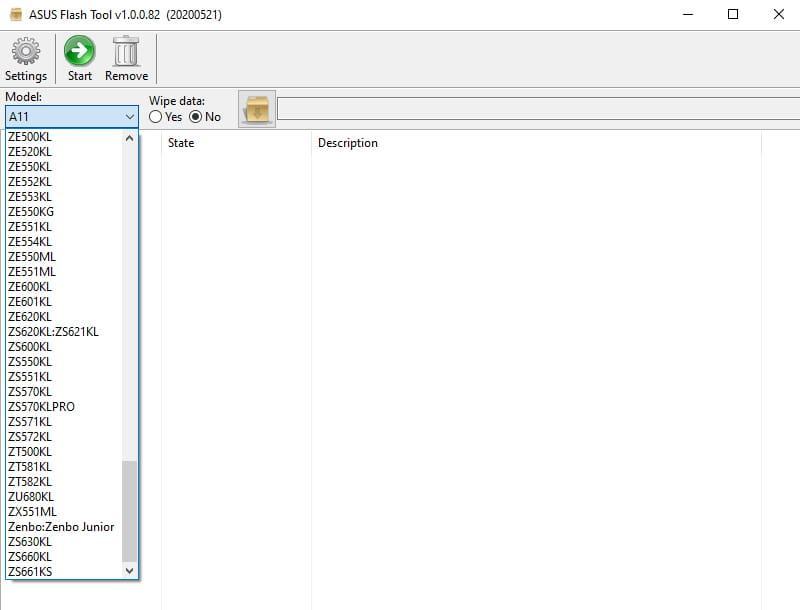
- Step 1: Select model of device
- Step 2: Choose to .RAW file (or .zip file)
- Step 3:
- Choose Yes, your data will be lost (Encourage)
- Choose No, your data will not be lost
- Step 4: Choose Serial number of device
- Step 5: Click Start and wait for a few minutes


