How To Make Scroll Bars Always Visible In macOS
(Scroll Bars Always Visible)Do you find it frustrating when scroll bars disappear on your Mac, making it challenging to navigate through long documents or web pages? Fear not! In this guide, we’ll show you how to make scroll bars always visible in macOS, ensuring smooth and hassle-free scrolling every time.
- Why Do Scroll Bars Disappear? Scroll bars in macOS are designed to hide when not in use, providing a clean and minimalist interface. While this design choice enhances the overall aesthetics, it can be inconvenient for users who prefer constant visibility.
- Benefits of Visible Scroll Bars
- Improved Navigation: Visible scroll bars offer better control and precision when scrolling through content.
- Accessibility: They make it easier for users with visual impairments or motor disabilities to navigate through content.
- Enhanced User Experience: Constantly visible scroll bars provide a sense of continuity and familiarity, enhancing the overall user experience.
- How to Make Scroll Bars Always Visible Follow these simple steps to ensure scroll bars remain visible at all times on your Mac:
- Step 1: Access System Preferences Open the Apple menu, go to “System Preferences,” and click on “General.”
- Step 2: Adjust Scroll Bar Settings In the “General” preferences window, locate the “Show scroll bars” option.
- For always-visible scroll bars, select “Always” from the dropdown menu.
- Alternatively, you can choose “Automatically based on mouse or trackpad” to let macOS decide when to show them based on your input device.
- Step 3: Enjoy Constantly Visible Scroll Bars Once you’ve made your selection, close the preferences window, and you’re all set! Scroll bars will now remain in all compatible applications.
- Customizing Scroll Bar Behavior macOS offers additional options to customize scroll bar behavior according to your preferences:
- Mouse and Trackpad Settings: You can adjust scroll bar visibility based on whether you’re using a mouse or trackpad. Simply navigate to “System Preferences” > “Accessibility” > “Mouse & Trackpad” and explore the available options.
- Terminal Commands: Advanced users can utilize Terminal commands to fine-tune scroll bar behavior further. However, exercise caution when using Terminal commands, as they can affect system stability if misused.
- Final Thoughts Ensuring scroll bars are always in macOS is a simple yet effective way to enhance your workflow and user experience. By following the steps outlined in this guide, you can enjoy seamless navigation through documents, web pages, and other content on your Mac.
Conclusion:
In conclusion, making scroll bars always visible in macOS is a user-friendly customization that can greatly improve usability and accessibility. Whether you’re a casual user or a power user, taking control of scroll bar visibility ensures a smoother and more enjoyable computing experience. So why wait? Give it a try today and see the difference it makes!
In macOS Ventura, Apple has made hiding scroll bars when not in use a default behavior of the operating system, but you can prevent this from happening if you know where to look. Keep reading to learn how it’s done.
If your Mac is running macOS Ventura, you may have noticed that it makes windows only when you are actively scrolling with your mouse or trackpad.
Apple has made this the default setting because it is in keeping with the minimalist UI design of macOS, but if you don’t see a scroll bar, you may not even know that a window can be scrolled, making navigation more difficult in general.
Fortunately, you can change this behavior pretty easily in macOS and make it so that always remains visible. The following steps show you how.
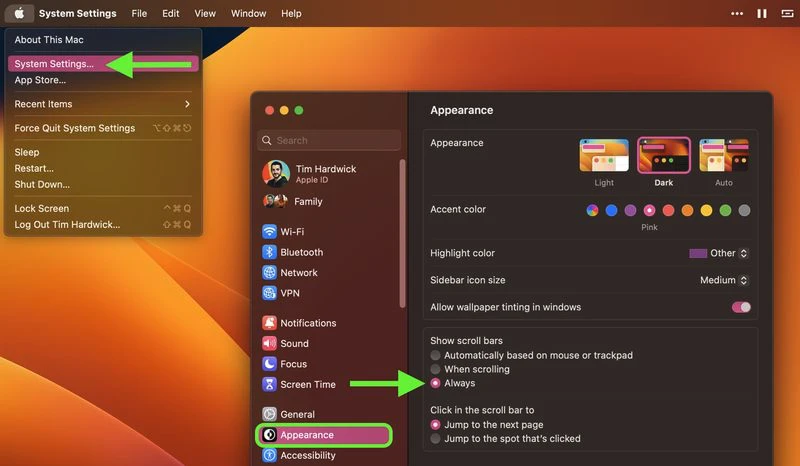
- Click the Apple () symbol in the top-left corner of your Mac’s menu bar, then click System Settings….
- Using the sidebar, scroll down and select Appearance.
- Under the “Show scroll bars” option, click the radio button next to Always.
Your preference will be implemented instantly, and you should now see scroll bars wherever scrolling is available.
Note that if you’re using macOS Monterey or earlier, the same setting can be found in the General panel of System Preferences.